Como corrigir falhas de instalação de driver no Omni 1 gravador a laser
Driver installation issues are some of the most common problems users face when setting up the Omni 1 gravador a laser. A failed driver installation can halt the machine’s operations, making it essential to fix the problem as soon as possible. In this section, we’ll explore how to overcome these issues, ensuring your engraver runs smoothly.
1.1. Verify Your Operating System
Before anything else, it is crucial to confirm that your operating system (OS) is compatible with the Omni 1 Laser Engraver’s driver requirements. Windows OS is the most commonly used platform for laser engravers, but it must be a legitimate, up-to-date version.
- Why a Legitimate OS Matters: Pirated or outdated versions of Windows may not support the driver files correctly, causing installation failures. O Omni 1 gravador a laser requires a stable OS to function, ensuring that communication between the engraver and software is seamless.
- Solução: If you’re using a non-licensed OS, consider upgrading to a legitimate version of Windows. Se possível, update to the latest release of Windows to ensure that all drivers and software are fully compatible. Always ensure your OS is free of malware, as viruses can also interrupt installation processes.
1.2. Substitua o cabo de dados
Às vezes, the issue may be as simple as a faulty data cable. USB cables are integral to establishing communication between your computer and the engraver. An old or damaged cable can cause connection issues, resulting in installation failures.
- Choosing the Right Cable: Always use magnetic-proof USB cables that provide stable data transfer and minimize signal interference. High-quality cables are designed to handle the high-speed data transfer that the engraver needs to function optimally.
- Why It’s Important: The data cable is responsible for transferring installation files, and a malfunctioning cable can interrupt the installation process. This is especially true with longer cables, as signal degradation increases with cable length.
1.3. Test a Different Computer or Port
If the previous two steps don’t resolve the issue, the problem could be linked to your computer’s hardware. Especificamente, seu Portas USB or internal motherboard connections may be malfunctioning.
- Test Another Computer: If you suspect the problem lies with your computer, try connecting the engraver to a different computer. If the installation succeeds, you may need to update drivers for your current system or troubleshoot the USB ports.
- Why This Works: Às vezes, internal computer issues (such as driver conflicts, software limitations, or damaged USB ports) prevent successful communication with external devices like the Omni 1 gravador a laser. By using another computer, you eliminate these variables and ensure that the engraver’s setup works properly.
How to Access Omni 1 Software When the USB Drive is Damaged
If you find that the USB flash drive that comes with your Omni 1 Laser Engraver is unreadable or damaged, it can be frustrating. Felizmente, there are alternative ways to access and install the necessary software.
2.1. Download from the Official Website
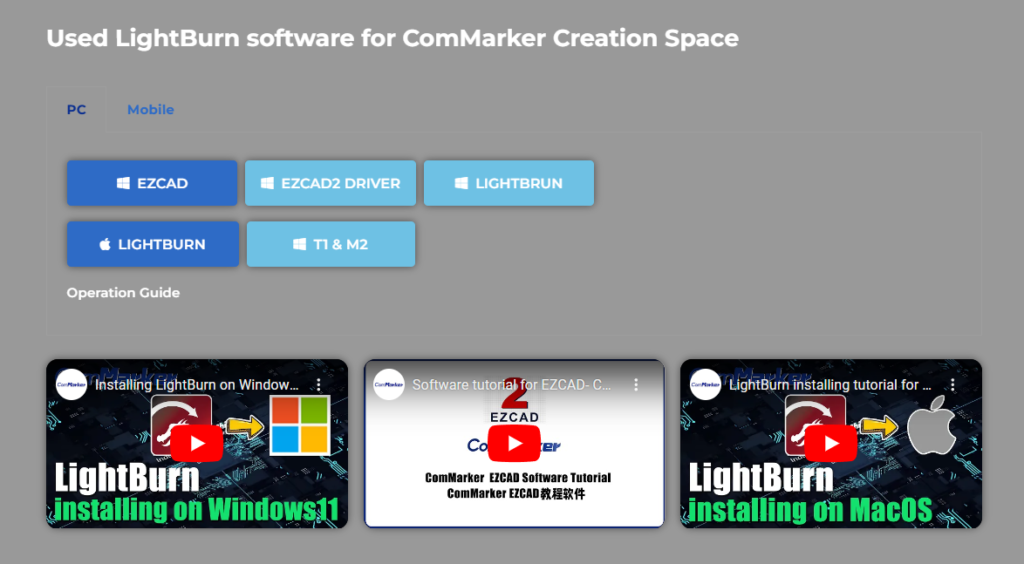
The first and best option when your USB drive is damaged is to download the required software from ComMarker’s official website. ComMarker frequently updates its drivers and software to improve functionality and compatibility with various devices.
- Step-by-Step Guide to Download:
- Visit the official ComMarker website.
- Navigate to the support or download section.
- Locate the Omni 1 Laser Engraver drivers and software.
- Click on the download link for your operating system.
- Follow the on-screen instructions to install the software.
- Why This Is Essential: Downloading from an official source ensures you’re getting the most recent, bug-free version of the software that’s guaranteed to be compatible with your system and engraver.
2.2. Contact Customer Support
If you’re still unable to download or install the necessary software from the official website, your next step should be to reach out to ComMarker’s customer support team. They are always ready to help resolve installation issues.
- What to Expect from Customer Support: Once you contact them via email or phone, they will guide you through the troubleshooting steps and may offer a new USB drive if yours is damaged beyond repair.
- How It Helps: Their support team can also provide valuable information on system compatibility, software versions, and additional resources that can help you get your Omni 1 gravador a laser running smoothly again.
How to Fix Red Light Preview Issues Without Engraving
When using the Omni 1, a red light preview is a crucial part of the engraving process. It allows you to position your materials accurately. If the red light works, but there is no mark or the mark is faint, it indicates that something isn’t calibrated properly. Here’s how to fix it:
3.1. Adjust the Focal Length
O distância focal is the distance between the lens and the material being engraved. If this is incorrect, the engraving will be out of focus, resulting in weak or nonexistent markings.
- Why This Matters: When the lens is not positioned correctly, the laser’s energy is dispersed, which weakens the engraving. O Omni 1 Laser Engraver requires precise focal adjustment to ensure that the laser energy is concentrated on the material.
- How to Adjust: Consult the Omni 1 user manual for guidance on adjusting the focal length. Most machines have an autofocus function that can help you set the optimal focal distance automatically.
3.2. Seek Help from After-Sales Support
If adjusting the focal length doesn’t solve the issue, the next step is to contact after-sales support. Às vezes, internal issues such as lens misalignment or software calibration problems require professional assistance.
- What to Expect: The support team will help you troubleshoot further, and may recommend more advanced calibration steps to ensure that your engraver is working properly.
How to Resolve ‘Dongle Not Found’ and Demo Mode Issues
Many gravadores a laser, incluindo o Omni 1, require a dongle for authentication. If your system shows that the dongle is not found and defaults to demo mode, it usually means there is an issue with the connection or the power supply.
4.1. Check Power and Connection
A dongle not found error often occurs when the machine is either not powered on, or the data cable is improperly connected.
- Why It Happens: The engraver’s software needs to verify that the hardware is correctly connected and powered to allow the engraving process to begin. If the connection is loose or the machine is off, the dongle won’t be recognized.
- Solução: Turn the engraver on and check all connections. Se necessário, unplug and reconnect the data cable to ensure a secure connection. This simple step often resolves the issue.
How to Fix Preview and Mark Size Inconsistencies
Às vezes, the preview shown in the software does not align with the actual size or position of the engraving. Here’s how to fix that:
5.1. Importar arquivo de calibração
Inconsistent preview and mark sizes often stem from improper machine calibration. To fix this, import the calibration file as directed in the operating instructions.
- Why Calibration Is Important: Calibration ensures that the engraver’s positioning system is accurately synchronized with the software’s design. An out-of-calibration machine will show discrepancies in the preview and actual marks.
- How to Calibrate: Follow the step-by-step calibration instructions in your manual, and ensure that the machine’s mechanical components are aligned with the software’s coordinate system.
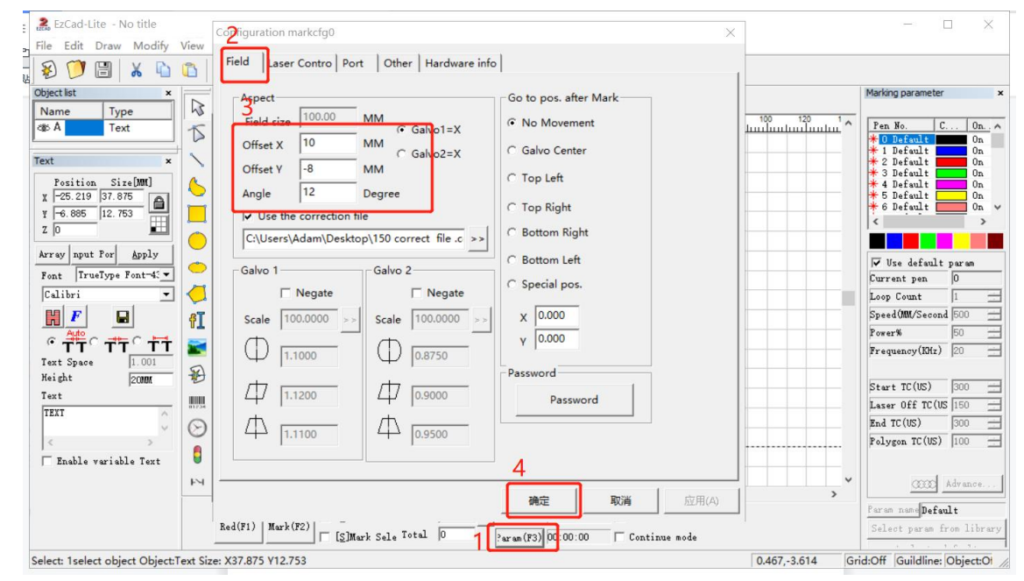
5.2. Adjust Offset Settings
If the calibration file doesn’t resolve the issue, adjust the offset settings in the software. These settings allow you to fine-tune the engraving position.
- Why Adjusting Offsets Helps: If your machine’s alignment is off, the offset feature helps you correct the position of the engraving by fine-tuning the X, Y, and angle measurements. This will ensure that your marks are in the correct position.
- How to Adjust: Access the “Parâmetro (F3)” menu, then adjust the “Offset X”, “Offset Y”, ou “Angle” based on ruler measurements.
How to Align Red Light Preview with the Engraving Position
Em alguns casos, o red light preview will not match the position where the engraving occurs. To fix this issue:
6.1. Import Calibration File Again
Import the calibration file to reset the machine’s alignment settings. Às vezes, files can become corrupted or misaligned, which may cause preview discrepancies.
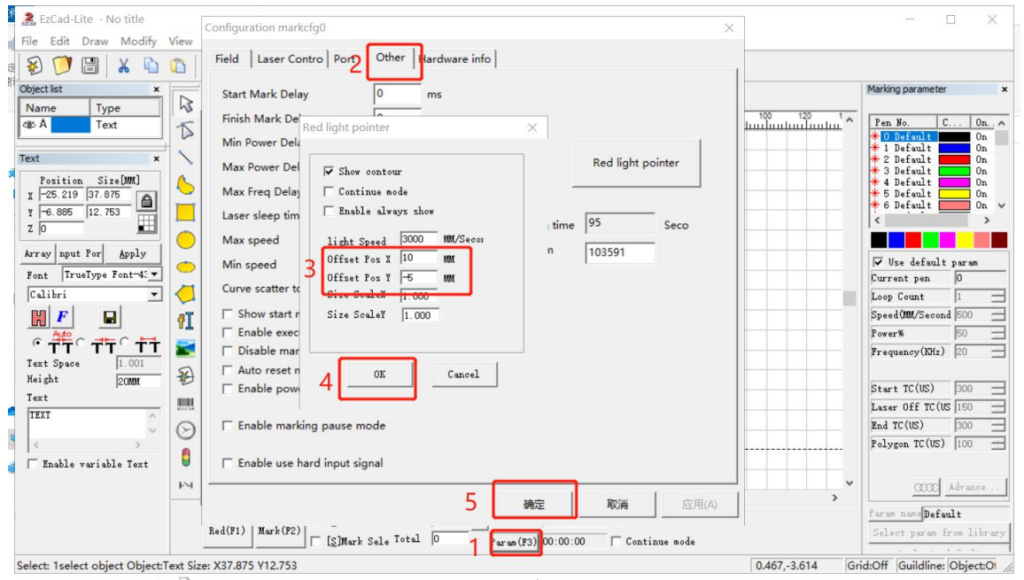
6.2. Ajustar as configurações de luz vermelha
Próximo, you can adjust the red light pointer settings manually to correct the alignment.
- How to Adjust: Go to the “Parâmetro (F3)” menu, selecione “Red Light Pointer”, and input the required “Deslocamento X” e “Deslocamento Y” values based on your measurements.
How to Fix Distorted Shapes in Previews or Engravings
If the shapes in your previews or final engravings appear distorted, this can usually be fixed with proper calibration and alignment.
7.1. Reload Calibration File
Often, distorted shapes indicate that the calibration file has been lost or corrupted. Reloading this file resets the machine’s alignment settings.
7.2. Seek Assistance
If distortion continues despite reloading the calibration file, contact customer support for more advanced troubleshooting options.
How to Solve Invisible Text or Images on the Canvas
If text or images imported into the Omni 1 Laser Engraver’s software do not display on the canvas, it can usually be fixed by centering the content.
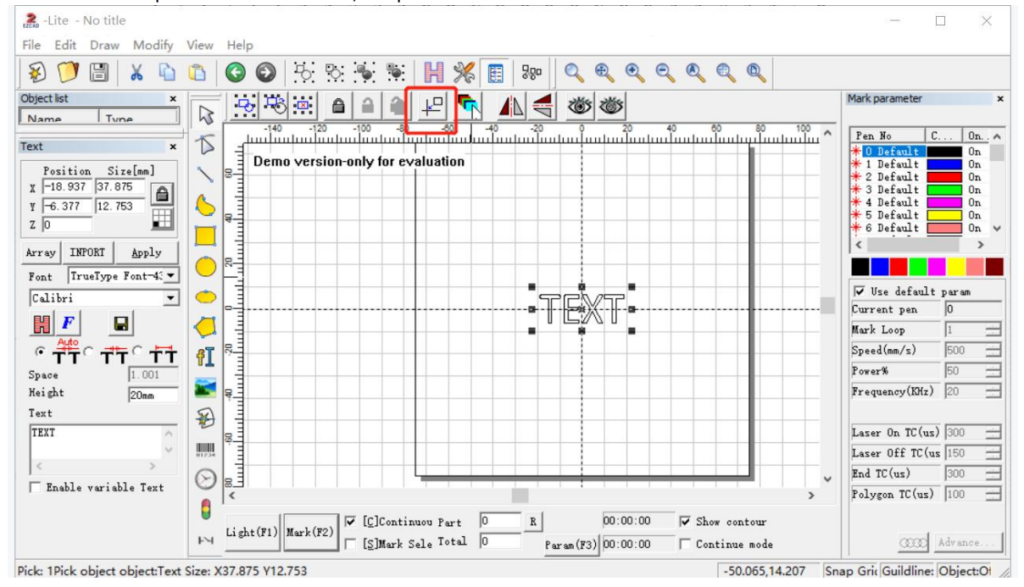
8.1. Center the Content
Clique no ‘Practical Center’ button to automatically position the image or text in the middle of the canvas.
- Why This Works: Às vezes, objects that are placed outside the visible canvas area won’t show up. Centering the content ensures that it appears in the correct position.
By following these steps and understanding the importance of each troubleshooting technique, you’ll be able to resolve common issues with the Omni 1 gravador a laser quickly and efficiently. Proper calibration, regular software updates, and attentive care to hardware connections are essential for ensuring long-term performance and engraving accuracy.


