DICA:
Ligue a energia deste dispositivo quando ele estiver bem aterrado. Use este dispositivo SOMENTE com uma mão de cada vez.
O laser é alimentado por uma conexão de tensão extremamente alta e colocar duas mãos na máquina ao mesmo tempo durante a operação tem o potencial de criar um circuito fechado com o corpo humano.,resultando em choque elétrico. A área ao redor deste dispositivo de gravação a laser deve ser mantida seca, bem ventilado, e ambientalmente controlado para manter a temperatura ambiente entre 40–95°F (5–35ºC). A umidade ambiente não deve exceder 70%.
Índice
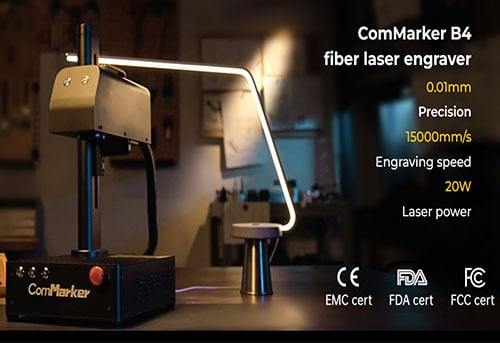
Guia de montagem do gravador a laser de fibra ComMarker B4
Usar a máquina de gravação a laser de fibra ComMarker B4 é simples. Basta seguir as oito etapas abaixo para concluir o processo.
1. Coloque as peças na mesa
Comece descompactando todos os componentes do Gravador a laser de fibra ComMarker B4. Disponha-os em um local limpo, superfície plana para garantir que você tenha todas as peças e ferramentas necessárias antes de iniciar a montagem.

2. Coloque o acoplamento no lugar certo do eixo
Localize o eixo em seu gravador a laser. garantindo que ele se encaixe perfeitamente em seu local designado. O acoplamento é essencial para conectar o motor ao cabeçote do laser, permitindo movimentos precisos durante a operação.

3. Aperte o acoplamento com os parafusos embutidos
Assim que o acoplamento estiver no lugar, use os parafusos embutidos fornecidos para prendê-lo firmemente. Isso garante que o acoplamento permaneça firmemente preso ao eixo durante o processo de gravação.

4. Prenda o poste de suporte com os parafusos
Próximo, posicione o poste de suporte verticalmente na base da máquina. Use os parafusos fornecidos para fixar o poste com segurança. Este poste suporta a cabeça do laser e garante estabilidade durante a operação.

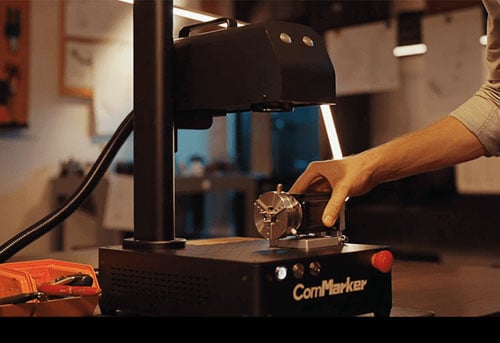
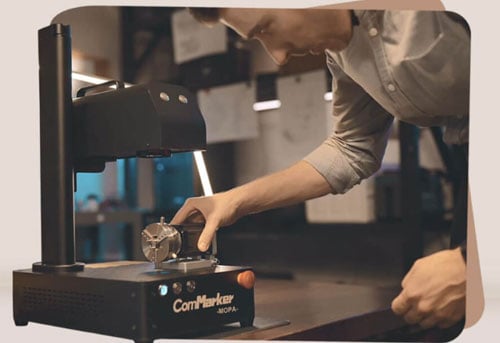
5. Coloque a cabeça do laser na prateleira de suporte e aperte os parafusos para fixar a cabeça do laser
Coloque cuidadosamente a cabeça do laser na prateleira de suporte. Alinhe-o corretamente e use os parafusos fornecidos para fixar a cabeça do laser na prateleira de suporte. Certifique-se de que a cabeça do laser esteja bem fixada para evitar qualquer movimento durante a gravação.

6. Coloque a junta no topo do poste, Circulando o parafuso de avanço
Pegue a junta e coloque-a em cima do poste de suporte, garantindo que ele circunde o parafuso de avanço. A junta ajuda a reduzir a vibração e garante um movimento suave da cabeça do laser ao longo do poste.

7. Fixe a manivela com um parafuso e uma junta
Anexe a manivela à máquina. Use um parafuso e uma junta para fixá-lo no lugar. A manivela permite o ajuste manual da posição da cabeça do laser, fornecendo precisão e controle durante a configuração e operação.

8. Conecte a máquina a laser ao computador e ligue a máquina
Finalmente, conecte seu gravador a laser de fibra ComMarker B4 ao seu computador usando os cabos fornecidos. Certifique-se de que todas as conexões estejam seguras. Uma vez conectado, ligue a máquina. Siga as instruções do software para concluir a configuração e começar a usar seu gravador a laser.

Gravador a laser de fibra ComMarker B4: Montagem de Suporte Auxiliar
Guia de montagem passo a passo
1. Coloque as peças na mesa
Comece por dispor todas as peças do suporte auxiliar sobre uma superfície limpa, superfície plana. Certifique-se de ter todos os componentes e ferramentas necessários antes de iniciar a montagem.

2. Conecte a barra de metal e o anel grande com os parafusos
Pegue a barra de metal e alinhe-a com o anel grande. Use os parafusos fornecidos para fixar com segurança a barra de metal ao anel grande. Esta conexão forma a estrutura primária do suporte auxiliar.

3. Fixe a barra de metal e o anel pequeno com parafusos
Próximo, prenda o pequeno anel à barra de metal usando os parafusos. Certifique-se de que o pequeno anel esteja firmemente fixado para fornecer estabilidade ao suporte auxiliar.

4. Prenda o colar de fixação na cabeça do laser com os parafusos
Posicione o colar de fixação ao redor da cabeça do laser. Use os parafusos para fixar o colar com segurança. Esta etapa é essencial para garantir que o suporte auxiliar esteja corretamente alinhado com a cabeça do laser.

5. Aparafuse o outro pequeno anel no colar de fixação
Pegue o outro anel pequeno e parafuse-o no colar de fixação. Este anel adicional ajuda a estabilizar o suporte auxiliar e garante um posicionamento preciso.

6. Aparafuse a peça montada conforme abaixo
Siga o diagrama de montagem fornecido com seu gravador a laser de fibra ComMarker B4 para aparafusar as peças montadas.. Certifique-se de que todos os componentes estejam bem presos para manter a estabilidade do suporte.

7. Ajuste a altura do suporte auxiliar de acordo com o comprimento do foco
Ajuste a altura do suporte auxiliar para corresponder ao comprimento do foco do seu gravador a laser. Esta etapa é crucial para alcançar o ponto focal correto para uma gravação precisa.

8. Aperte o pequeno anel para fixar o suporte auxiliar com o ponto de foco direito
Depois de ajustar a altura, aperte o pequeno anel para travar o suporte auxiliar no lugar. Certifique-se de que o suporte esteja fixado no ponto de foco correto para otimizar a precisão da gravação.

Como instalar os drivers para seu gravador a laser de fibra?
1.Instale o driver
Observação: por favor realize a seguinte operação antes de instalar o driver
1) A máquina está ligada;
2) Mantenha o botão de emergência não pressionado;
3) Cabo de dados conectado
1. Abra o gerenciamento de dispositivos
Comece clicando com o botão direito em “Este PC” ou “Meu computador” na sua área de trabalho ou no explorador de arquivos. No menu de contexto, selecione “Gerenciar” para abrir a janela Gerenciamento do Computador.

2. Acesse o Gerenciador de Dispositivos
Na janela Gerenciamento do Computador, Clique em “Gerenciador de Dispositivos” no painel esquerdo. Isso exibirá uma lista de todos os dispositivos de hardware conectados ao seu computador.

3. Localize o dispositivo
No Gerenciador de Dispositivos, procure por “USBLMCV2”, “USBLMCV4”, ou “Dispositivo desconhecido” em “Outros dispositivos” ou “Dispositivos Universal Serial Bus”. Essas entradas representam seu gravador a laser de fibra que precisa do driver instalado.

4. Atualize o driver
Clique com o botão direito em “USBLMCV2”, “USBLMCV4”, ou “Dispositivo desconhecido” e selecione “Atualizar driver” no menu de contexto.

5. Procure drivers
Na janela Atualizar software de driver, escolher “Procure drivers no meu computador”. Esta opção permite que você selecione manualmente os arquivos do driver do seu computador.

6. Localize os arquivos do driver
Insira a unidade USB que acompanha o gravador a laser de fibra no computador. Navegue até a unidade USB no explorador de arquivos e encontre a pasta que contém os arquivos do driver correspondentes ao seu sistema Windows. Selecione esta pasta e clique “OK”.

7. Instale o driver
Clique “Instalar” para iniciar o processo de instalação do driver. Siga quaisquer instruções adicionais na tela para concluir a instalação.

8. Conclua a instalação
Assim que a instalação for bem-sucedida, clique em “Concluir”. Você deve ver agora “Dispositivo BJJCZ” listado no Gerenciador de dispositivos, indicando que o driver foi instalado corretamente.

Observado: *Recomenda-se copiar e colar os arquivos do disco USB na área de trabalho do computador ou em outros discos do computador. *Se a instalação do driver não for bem-sucedida, consulte as perguntas frequentes 1
2. Abra o software
- Acesse a pasta USB:
- Abra a pasta USB que acompanha o seu gravador a laser de fibra.
- Navegue até o “EZCAD para ComMarker” pasta.
- Se sua lente for 110mm, selecione a pasta 110mm.
- Inicie o EZCAD2:
- Abra o software “EZCAD2” da pasta selecionada.
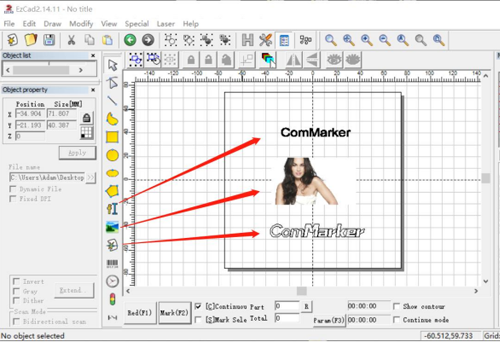
- Pode entrar “texto”, importar “foto” ou “arquivo vetorial”. Para testes iniciais, é recomendado selecionar e testar com texto.

3. Importe o arquivo de correção
- Abrir configurações de parâmetros:
- Em EZCAD2, selecione “Parâmetro (F3)”.
- Marcação “Usar arquivo correto”.
- Selecione o arquivo de correção:
- Escolha o arquivo que termina em .cor na unidade flash USB (ou o arquivo que foi copiado para o disco do computador).
- Clique “OK (confirme)” para aplicar o arquivo de correção.

4. Ajuste o foco
- Encontre o melhor ponto focal:
- Use os botões para cima ou para baixo para levantar ou abaixar a cabeça do laser até que os três pontos de luz vermelha se sobreponham.
- O ponto onde estas três luzes vermelhas se sobrepõem é o ponto focal ideal para gravação.
- Meça a distância focal:
- A distância focal de medição para esta máquina é específica para a lente:
- 110lente mm: _______ milímetros
- 200lente mm: _______ milímetros
- A distância de medição é o comprimento da linha inferior da cabeça do laser até a superfície do material de gravação. Este parâmetro é medido manualmente, e cada dispositivo pode ter distâncias focais diferentes devido a variações nas fontes de laser e lentes de campo.
- A distância focal de medição para esta máquina é específica para a lente:

Observação: Antes da máquina sair da fábrica, fizemos a correção da luz vermelha (para lente de 110 mm). Na posição onde os três pontos de luz vermelha se sobrepõem, o laser emite a luz mais forte. No entanto, devido a razões de transporte, o ponto de foco das luzes vermelhas que você recebeu pode mudar, e o ponto de foco não seria a melhor distância focal. Por favor, opere conforme as seguintes etapas:
1. Coloque a placa de teste de aço inoxidável
- Posicione a placa de teste:
- Coloque a placa de teste de aço inoxidável na mesa da máquina.

2. Ajuste a cabeça do laser
- Encontre o melhor ponto focal:
- Levante ou abaixe a cabeça do laser até o melhor ponto focal, conforme indicado pelo número manuscrito fornecido.

3. Ligue a máquina e conecte
- Ligue e conecte:
- Ligue a máquina.
- Conecte a máquina ao computador.

4. Importar texto para teste
- Parâmetros de teste de carga:
- Importe o arquivo “TEXT” para teste no software.
- Selecione os parâmetros padrão.
- Marque o botão “parte contínua”.

5. Teste a marcação
- Verifique a área de marcação:
- Pressione “vermelho (F1)”Para garantir que a área de marcação esteja alinhada com o material de teste.
- Clique em “marcar” para iniciar a marcação contínua com o laser.

6. Ajustar a intensidade do laser
- Otimize a força do laser:
- Enquanto o laser está marcando, levante ou abaixe a cabeça do laser.
- Observe a mudança na intensidade do feixe de laser.
- Pare de ajustar quando o laser trabalhar com o feixe mais forte.

7. Alinhe a luz vermelha auxiliar
- Afrouxe os parafusos:
- Afrouxe os parafusos dos dois feixes da luz vermelha auxiliar.
- Sobreposição de pontos de luz vermelha:
- Ajuste manualmente a posição relativa dos pontos de luz vermelha para fazê-los se sobrepor.

8. Garanta a posição
Ajuste manualmente a posição relativa dos pontos de luz vermelha para fazê-los se sobrepor. E aperte os parafusos

5.Teste de Marcação
- Prepare o material:
- Coloque o material de gravação de teste na máquina.
- Verifique a área de marcação:
- Clique “Vermelho (F1)” para garantir que a área de marcação esteja alinhada com o material de teste.
- Começar a marcar:
- Marque “Parâmetros padrão”.
- Clique “Marca (F2)” para começar a marcar.

Parâmetros

Acessórios

Perguntas frequentes: Gravador a Laser de Fibra ComMarker B4
1º trimestre: A instalação do driver não teve êxito?
- Verifique o seu sistema Windows: Certifique-se de estar usando um sistema Windows licenciado. Se não, tente usar outro computador.
- Substitua o cabo de dados: Use um cabo de dados à prova magnética para obter melhores resultados.
- Verifique as portas USB: As portas USB frontais em gabinetes de desktop costumam ser danificadas. Tente usar portas USB traseiras ou outro computador.
- Status da máquina: Certifique-se de que a máquina esteja ligada, o botão de emergência não foi pressionado, e o cabo de dados está conectado corretamente.
- Contate o suporte: Se os problemas persistirem, entre em contato com o suporte pós-venda ou envie-nos um e-mail.
2º trimestre: O driver no gerenciador de dispositivos é diferente das instruções deste manual.
- Drivers conflitantes: Esse problema ocorre se outro driver, como o driver LightBurn, está instalado. Desinstale o driver incorreto e exclua-o.

3º trimestre: A unidade flash USB está danificada e não pode ser aberta.
- Baixe do site: Visite o site oficial do ComMarker para baixar o driver e software B4.
- Contate o suporte: Envie um e-mail para a equipe de pós-venda para obter assistência.
4º trimestre: A visualização da luz vermelha funciona com um retângulo, mas não há nenhuma marca ou as marcas são muito claras.
- Ajustar distância focal: Consulte a etapa 4 das instruções de operação para ajustar a distância focal.
- Contate o suporte: Se o problema persistir, envie um e-mail para a equipe de pós-venda.
Q5: Não é possível encontrar o dongle, software funciona em modo de demonstração, ou não consegue abrir o driver LMC.
- Verifique as conexões: Certifique-se de que a máquina esteja ligada e conectada ao computador por meio do cabo de dados.
Q6: O botão para cima e para baixo não funciona; a máquina não se move ao pressionar o botão.
- Ajustar acoplamento: Reajuste o ângulo do acoplamento e fixe-o novamente com parafusos.

Q7: O tamanho da visualização e da área de gravação é inconsistente com o tamanho do software, a visualização da luz vermelha é inconsistente com a posição real da gravação, ou a visualização e a marca não são horizontais ou verticais, mas angulares.

- Importar arquivo de calibração: Use o arquivo de calibração da unidade USB incluída com a máquina. Consulte a etapa 3 das instruções de operação.
- Ajuste manual: Selecione “Parâmetro (F3)”, então “Outro” e “Ponteiro de luz vermelha”. Insira números em “Deslocamento X” e “Deslocamento Y” com base no desvio real.
- Contate o suporte: Se o problema persistir, entre em contato com a equipe de pós-venda por e-mail.

P8: Como alterar a área de marcação física no software?
- Ajustar parâmetros de campo: Clique “Parâmetro (F3)”, então selecione “Campo”. Insira números em “Deslocamento X”, “Deslocamento Y”, ou “Ângulo” com base em medições com uma régua.

Q9: Algumas das áreas de gravação são claras, enquanto outras são claras.
Lente de campo limpo: Certifique-se de que a lente de campo esteja limpa. Se estiver sujo, limpe-o com cuidado.
Verifique o caminho óptico: Certifique-se de que a parte frontal e traseira do caminho óptico estejam niveladas. Afrouxe e fixe novamente os parafusos que conectam a coluna e o caminho óptico.

Garanta a perpendicularidade: Certifique-se de que a base oval do poste esteja perpendicular ao poste.

Aperte os parafusos: Reaperte os parafusos das peças metálicas que suportam o caminho óptico.

Q10: Há apenas um ponto de visualização e marcação a laser.
- Verifique a potência do galvanômetro: Remova a tampa do caminho óptico e verifique se o cabo DB15 ou DB25 está desconectado. Reconecte se necessário.

Q11: A luz vermelha de visualização não está clara, ou não há luz vermelha de visualização.

- Ajustar fonte de luz vermelha: Remova a tampa da cabeça do laser, ajuste manualmente a fonte de luz vermelha, mova e conserte novamente, ou desmonte e reinstale.

Q12: Nada é exibido no quadro de tela ao importar texto ou imagens.
- Centralizar conteúdo: Clique no prático botão central para centralizar a imagem e o texto na tela.

Q13: O laser fica mais fraco, e o efeito de gravação piora.
- Lente de campo limpo: Limpe a lente de campo com um pano limpo. Se a tampa da lente não for removida durante a marcação, pode causar poluição e desempenho mais fraco do laser.
- Substitua a lente de campo: Se a lente de campo estiver muito poluída, pode precisar ser substituído.
Q14: Qual versão do software LightBurn é adequada para o ComMarker B4?
- Licença existente: Adquira “Adicionar dispositivos Galvo à chave de licença existente” se você já tiver o software para um tipo de pórtico.
- Nova Licença: Escolha a opção “LightBurn- Chave de licença Galvo” se você ainda não comprou nenhuma licença.