소개
레이저 조각은 아이디어를 실현할 수 있는 매우 유망한 프로세스입니다.. 디자이너 또는 프로듀서로서 예술적이고 다양한 솔루션을 고안할 수 있도록 지원합니다.. 수년에 걸쳐, 사람들은 레이저 조각의 장점을 잘 알지 못했습니다., 아티스트에게 여러 지연을 발생시킵니다.. 이러한 이유로, 이 튜토리얼을 통해 이 프로세스의 이점을 풀고 깊은 이해를 위해 해당 현상에 대해 논의할 필요가 절실합니다.!

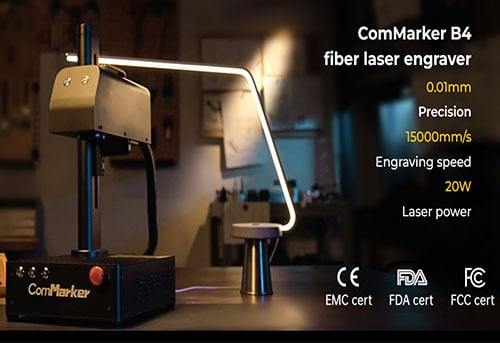
ComMarker B4 60W JPT MOPA 파이버 레이저 마킹 머신
가지고 다닐 수 있는 & 입수 가능한: B4 MOPA 60W 파이버 레이저 마킹기의 무게는 22kg에 불과합니다.; 336*555*635mm 이내의 컴팩트한 사이즈. 전기 리프팅: 정밀한 포커싱을 위한 숨겨진 리프팅 모터 내장. 컬러 마킹 & 슈퍼 커팅 능력: 스테인레스 스틸에 컬러 조각 가능, 알루미늄에 흑백, 0.01mm 정확도로 최대 2mm 두께의 금속 절단. 넓다…
비디오 콘텐츠 개요
이 상세한 튜토리얼은 레이저 조각의 모든 단계로 구성되어 초보자가 더 잘 이해할 수 있습니다.. 우리는 왜 레이저 조각이 수년에 걸쳐 그렇게 큰 인기를 얻었는지, 무엇이 레이저 조각을 그렇게 특별하게 만드는지 논의할 것입니다..
단계 1: 초기 설정 및 연결

첫 번째 단계는 Mopa Machine과 EzCad를 설치하는 것입니다. 콤마커 제대로. 노트북이나 컴퓨터와 연결해 보세요. 기계와 모든 구성 요소가 부착되어 작동하는지 철저히 확인하십시오. 수정 파일을 가져왔는지 최종 확인하고 검토하여 원활하고 완벽한 조각 프로세스를 보장합니다..
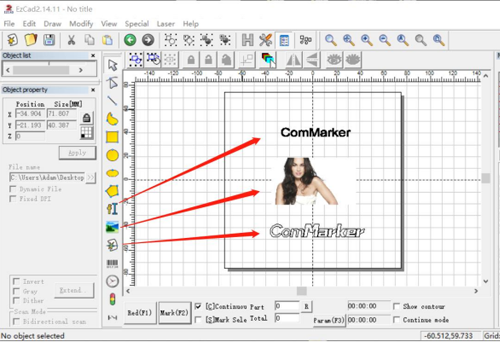
단계 2: 콤마커 및 인터페이스

콤마커 포함, 감독 소프트웨어에 액세스할 수 있습니다.. 소프트웨어를 사용하는 이유는 이 조각사를 보다 효율적이고 재미있게 사용하기 위해서입니다.. 현대의 레이저 조각사 이제 아티스트의 조각 작업을 지원하는 다양한 디자인 도구와 함께 작업할 수 있습니다.. 이 소프트웨어의 직관적인 인터페이스를 통해 조각기를 쉽게 처리하고 디자인 품질을 향상시킬 수 있습니다..
단계 3: 재료 준비

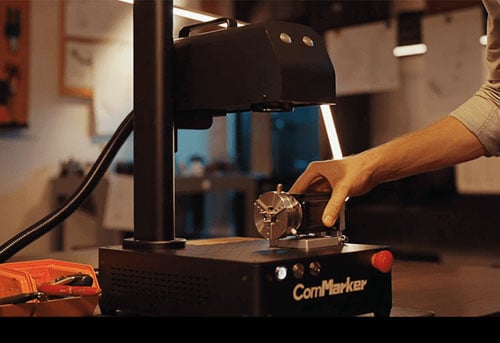
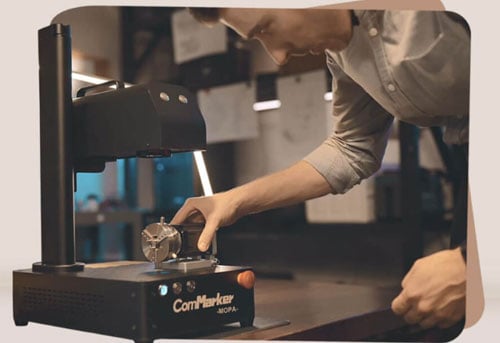
기계를 설정한 후, 조각할 물질과 재료를 로딩하는 다음 단계로 넘어갑니다.. Mopa 기계의 플랫폼에 모든 재료를 놓습니다.. 모든 재료가 올바르게 정렬되었는지 확인하십시오., 그런 다음 필요한 경우 조각 중 결함과 오류를 방지하기 위해 단단한 클램프로 고정하십시오.
단계 4: 조각 도구 선택
MOPA 갈보 기계와 같은 적절한 스타일러스 또는 조각 도구를 선택하는 것이 중요합니다.. 고품질의 정확한 조각을 만들기 위해, 스타일러스가 재료 및 Mopa 기계와 적합하고 호환되는지 확인하십시오..

단계 5: 색상 선택
다음 단계는 조각 작업의 다양한 부분에 적합한 색상을 선택하는 것으로 구성됩니다.. 테스트 결과에 따라 색상을 선택하세요, 프로젝트 요구사항에 잘 어울리는 색상을 선택하는 것이 중요합니다.
단계 6: 프로젝트 설계
디자인은 귀하의 프로젝트를 다른 프로젝트보다 돋보이게 만드는 것입니다. 자신의 취향과 관점을 반영하기 때문에 정확성과 창의성이 필요한 중요한 단계입니다.. 새로운 프로젝트 디자인을 하거나 미리 만들어진 레이아웃을 활용하는 경우, Mopa 기계의 재질 및 해상도와 호환되어야 함을 직접 확인하십시오. 선택한 색상의 해당 매개변수에 따라 (속도, 힘, 펄스 폭, 빈도, 간격, 패스 수), 해당 영역을 채우다. 해당 색상의 매개변수가 테스트 파일의 해당 색상 매개변수와 완전히 일치하는지 확인하세요..
단계 7: 디자인 업로드 및 조정
이 효율적인 소프트웨어를 사용하면 전원과 같은 조각 설정을 확인하고 조정할 수 있습니다., 해결, 프로젝트 요구 사항에 따라 속도를 높일 수 있습니다. 소재에 맞게 크기와 위치를 변경하세요.
단계 8: 조각 과정 시작
이 지점에서, 당신은 조각에 필요한 모든 것을 갖추고 있습니다. 이제 "조각" 버튼을 눌러 조각 과정을 시작하세요.. 기계는 입력에 따라 다양한 색상과 디자인에 대한 매개변수를 자동으로 선택하고 원하는 디자인을 만듭니다..
단계 9: 최종 결과 검사
마지막이지만 가장 중요한 단계는 최종 검사입니다.. 결국 프로젝트를 분석하면 디자인이 보장됩니다., 색상, 그리고 각인이 제대로 되었는지. 또한 향후 원치 않는 이벤트를 방지하기 위해 오류를 미리 찾을 수 있습니다. 실패해도 걱정하지 마세요, 조각 과정을 검토하고 잘못된 매개변수가 사용된 영역을 확인하세요.. 비교를 통해, 오류의 원인은 후속 프로세스에서 명확하고 개선될 수 있습니다..
안전 예방 조치
고려해야 할 또 다른 필수 사항은 안전입니다.. 레이저 조각은 부작용으로부터 자신을 보호하기 전까지는 재미있습니다.. 레이저 조각의 주요 단점 중 하나는 독성 방출입니다.. 그러므로, 당신은 공개된 환경에서 프로젝트를 진행해야 합니다., 적절하게 통풍이 잘되는 공간.또한, 먼지와 연기를 추출할 수 있는 연기 추출기를 사용하는 것이 좋습니다..

ComMarker 연기 추출기-100W
브러시리스 모터 저소음 및 고속 연기와 연기가 나는 곳에서 작업하는 경우 적극 권장합니다.! 3-스테이지 필터 |
문제 해결 및 유지 관리
조각사는 시간이 지남에 따라 잠재적인 손상을 입을 수 있습니다., 이는 성능을 손상시킬 수 있습니다.. 조각사를 이것으로부터 구하기 위해, 당신은 그것을 처리해야합니다. 일부 사용자는 조각사에 대해 배워야 합니다.’ 소프트웨어 문제 해결 및 기계적 유지 관리. 이로 인해 많은 재작업 및 교체 비용이 소요됩니다.. 그러므로, 완벽한 디자인과 인상을 만들기 위해서는 조각사의 문제를 제때에 주의 깊게 처리해야 합니다..
레이저 조각에 대한 추가 팁과 요령
아래에, 조각사를 보다 쉽고 전문적으로 사용하기 위한 추가 팁을 찾을 수 있습니다., 귀하의 인상을 돋보이게 하는 데 도움이 될 것입니다!
- 주파수 및 펄스 폭 설정 실험: Mopa의 가장 좋은 점 레이저 조각사 넓은 범위의 주파수와 펄스 폭을 가지고 있습니까?. 왜? 이러한 기능으로 제어하여 디자인을 돋보이게 하고 컬러 조각을 할 수 있기 때문입니다.. 새로운 재료로 작업하기 전에, 올바른 전력을 찾기 위해 그리드 테스트를 수행하는 것이 좋습니다., 속도, 빈도, 재료의 간격과
- 물질적 응답 이해: 다양한 재료의 특성과 특성이 레이저 조각에 고유하게 반응한다는 것은 분명합니다.따라서, 뭔가 잘못되었을 때 충격을 받지 않으려면 이 반응을 경험할 준비가 되어 있어야 합니다.. 인터넷을 통해 선택한 재료의 특성에 대해 알아보고 조각사에게 어떻게 반응하는지 확인하는 것이 더 좋습니다.. 매번 원활한 조각을 만드는 데 도움이 될 것입니다..
- 정기적인 연습과 실험: 조각사와 친해지려면 꾸준한 연습의 힘을 과소평가하지 마세요.. 그렇지 않으면 필요할 때 까다롭고 복잡한 디자인에 사용할 수 없습니다.. 이것은 당신의 자신감에 타격을 줄 수 있습니다, 그리고 당신은 곧 조각을 포기할 수도 있습니다. 이 모든 것을 피하려면, 온라인에서 여러 비디오를 시청하고 다양한 사람들이 자신의 스타일에 따라 조각기를 사용하는 방법과 그들로부터 배울 수 있는 방법을 알아보세요..
- 각 프로젝트에서 배우기: 우리 모두 실수를한다, 그리고 조각 전문가, ~도, 한 번 실수를 여러 번 저질렀다. 하지만, 특정 조각 디자인을 얻을 수 없으면 그만둬야 합니다. 실수를 기록하고 무엇이 잘못되었는지 확인해야 합니다.. 그 다음에, 다음 프로젝트를 시작하기 전에 작업할 수 있습니다.. 조각사의 설정을 마스터하는 방법입니다., 그 속도처럼, 힘과 간격, 귀하의 프로젝트에 매우 중요한.
- 얇은 소재에는 주의하세요: 재료가 열에 의해 타거나 변형되는 것을 방지하기 위해 낮은 전력으로 테스트하십시오.
결론
전반적인, 모파 섬유 레이저 조각사 성공적인 조각 과정을 위해서는 기계에 여러 단계가 필요합니다.. 이 단계에는 기계 설정이 포함됩니다., 그리드 테스트 결과에 따라 올바른 색상 선택, 설정 수정, 에칭, 최종 품질 및 정밀 검사. 성공을 위해서는 모든 단계가 똑같이 중요합니다., 고품질, 정확한 최종 각인 제품.
여기 레이저 조각기에 관한 자세한 튜토리얼이 있습니다.. 바라건대, 우리의 지침은 처음으로 레이저 조각을 사용하는 것에 대한 두려움을 극복하는 데 도움이 되므로 이제 이 과정을 알고 계실 것입니다.. 조각사를 이용해 원하는 만큼 창의력을 발휘해 보세요., 하지만 그러는 동안, 예방 조치를 취하다, ~도!
이제 멋진 Commarker 레이저 조각기로 진정한 조각 잠재력을 보여줄 시간입니다.. 계속해, 실험을 하다, 오늘 여러분의 상상을 현실로 만들어 보세요! 이 환상적인 조각사를 사용하신 후 언제든지 피드백을 보내주세요.. 그래서, 주변의 다른 사람들이 시도해보고 즉시 상상 속에서 걸작을 만들 수 있도록 힘을 실어줄 수 있습니다.!
비디오 튜토리얼: